QuickBooks is one of the best accounting software that empowers the businesses to create print pay stubs in QuickBooks, and managing employees payroll at an ease. In QuickBooks desktop software, a pay stub is created in a printable pdf format that looks to similar to a check. Each piece of information in a pay stub ensures that employees are paid correctly with the right tax details.
“If you need any information or help related with the QuickBooks accounting software, then you can get in touch with our experts via call at +1855-603-0490.”
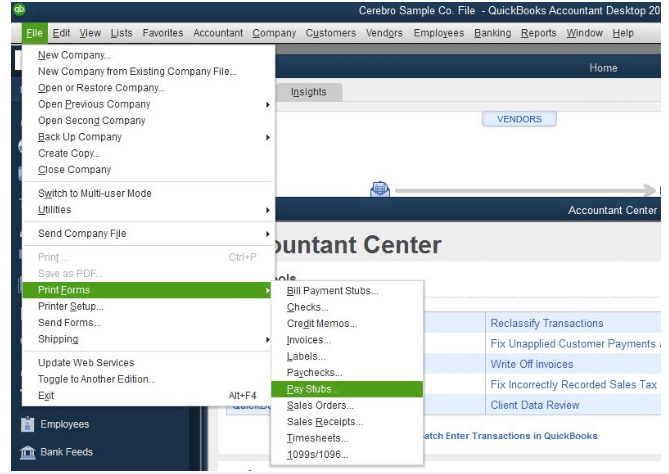
Table of Contents
What is QuickBooks Pay Stubs?
A Pay Stub is a document issued by the employer that shows the employee’s gross earnings, deductions, and net pays. These pay stubs are created in conjunction with paychecks so that each employee can get a new pay stub for each pay period. Pay Stubs are also known as wage statements, paycheck stubs, or pay slips.
Here are the common details that you will be able to see in the QuickBooks pay stub;
- Employee details
- Dates covered
- Gross wages
- Net wages
- Hours worked
- Rates paid
- Tax deductions
Let’s know techniques of printing pay stubs in QuickBooks desktop:
Are you searching for the proper instructions to print pay stubs in QuickBooks Desktop? If that’s so then, you must have a look at the steps provided below.
Solution 1 – Print by Bill Payment Stubs
- Open file menu and select ‘Print Form and select Payment Stubs’.
- Now choose credit card or check depending upon the method of billing from the bill payment dropdown menu.
- After that, choose the appropriate bank/credit card account from the Account dropdown.
- Now enter the beginning and end dates in the dated and amp section to list payments from a different date range.
- Choose checks from which you want to print bill payment stubs and press OK.
- Now give print command and set up a total number of copies you want.
Solution 2 – Print Pay Stub from Paycheck
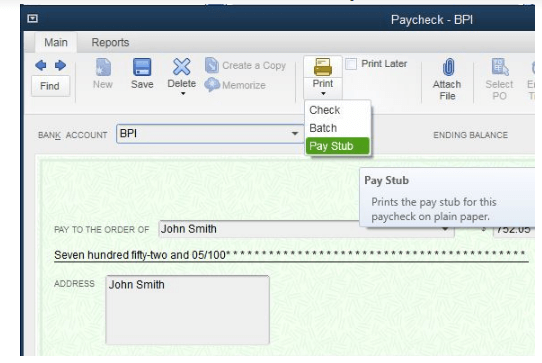
- Open Paycheck in QuickBooks desktop.
- Now choose the print icon in the check.
- Then select Pay Stub.
Solution 3 – Print through the Paycheck List
- First of all, choose employees on the left side of the navigation bar.
- Click on employer name to pay.
- Now press ‘Pay checklist’ on the employee’s page.
- Then select ‘Checks to pay’.
- Look for the check number if it’s applicable.
- Choose ‘Batch action’ and then ‘Print’ from the dropdown arrow.
Also, you can Read – How to print W-2 forms in QuickBooks Desktop?
Solution 4 – Print Pay Stubs from QuickBooks Desktop File Menu
- Select file >Print Forms >Pay Stubs >Payroll Bank Account.
- Fill the date range that has the pay date to be printed.
- If you want to filter by ‘One Employee’. Select ‘Employee’ from the dropdown of the employee option.
- Now choose Pay Stubs you are looking to print.
- You can take the preview of the Pay Stub before printing.
- Choose preference of company and employee info that will be there on the Pay Stub.
Solution 5 – Print by Pay Stub and Voucher Printing
- Open QuickBooks and Press ‘Edit’ from the menu bar.
- Choose preference >payroll and employees >Company Preferences.
- Now select ‘Full Payroll’ in QuickBooks Payroll Features Section.
- Then go to the ‘Set preferences for’ >Pay Stub and Voucher Printing.
- Click on the checkboxes you want to include in the paycheck vouchers and pay stubs print section.
- If you want your company name on the pay stub, then select ‘Legal Company Name’ and click OK.
Solution 6. Print Pay Stubs Through Bill Payment Stubs
Let’s take a look at the steps that you follow to print pay stubs on QuickBooks desktop via bill payment stubs;
- First, go to the “File” menu and click on the “Print Form” option.
- Thereon, you have to click on the “Bill Payment Stubs” option.
- Now, depending on the method through which you want to make the payment, select either the “Credit Card” or “Check” option from the bill payment drop-down list.
- After that, navigate to the account drop-down list, and then select the appropriate bank or credit card account.
- Here, if you want to include the payments from a different time range, you must provide the opening and closing dates in the “Dated and amp” section.
- Now, to print the bill payment stubs, you must select the “Checks” option and then click on the “OK” option.
- After that, you must check the printer and font settings and enter the number of print copies.
- At last, click on the “Print” option in the print window.
By carrying out the steps mentioned above, you have successfully printed the pay stubs on the QuickBooks desktop through the bill payment stubs.
Conclusion
We hope you find this blog useful. In this blog, we have tried our best to cover all the authentic and useful information about how to print pay stubs on QuickBooks desktop. Above, we have provided you with six solutions that you can execute to print pay stubs through different mediums.
If you still have any queries related to the pay stubs in QuickBooks, then you can connect with our QuickBooks experts through the chat box. You can also write us your query via mail at info@quickbooksupportnet.com. Our QuickBooks experts are available 24*7 at the help desk to resolve your query.
Frequently Asked Questions (FAQ)
Q 1. How can I modify the pay stub template in QuickBooks?
Ans. Given below are the steps that you can follow to change the pay stub template in QuickBooks;
- First of all, click on the “Edit” option and then select the “Preferences”> “Payroll and Employees” option.
- Moving ahead, you have to click on the “Pay Stub and Voucher Printing” buttons.
- After that, you must deselect the check boxes for showing the information in the payroll printing preferences window.
- At last, you have to end this process by double-clicking on the “OK” option.
Q 2. How can I share access of stubs in QuickBooks desktop to employees?
Ans. If you want to give an access of pay stubs to your employees in QuickBooks desktop, then here are the steps that you can follow;
- First of all, navigate to the left menu of the QuickBooks desktop and click on the “Payroll” option.
- Thereon, click on the “Employees” menu option.
- After that, you have to search for the desired employee.
- Next, under the personal information section, click on the “Personal info” section, and then you have to click on the “Resend” option available on the “Invite this employee to view their pay stubs and W-2s online.”
- At last, click on the “Done” option
- Go to the “Edit” section, and select “Preferences” option.
- Thereon, you have to move towards the “Company Preferences” tab.
- Now, select the preferred account name that you wants to print on the voucher, followed by a click on the “OK” option.