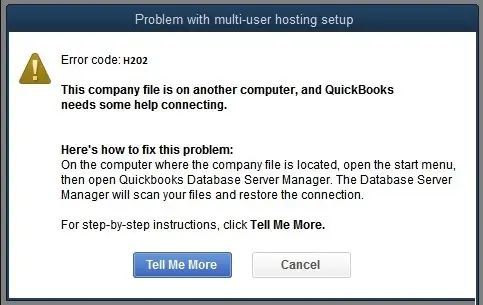
QuickBooks Error H202 falls under the category of H series of error that mainly occur while switching from single-user to multi-user mode. In other instances, it may evoke when the users fails to access the data file placed on different location. Whenever the user come across the error, the following error message comes into view:
In this explanatory guide, we have discussed about what causes the QuickBooks Error Code H202 and how to overcome it. Let’s start reading this post and get the issue resolved within no time.
Getting issues while switching to multi-user mode due to QuickBooks Error H202? Call us at @+1-855-603-0490 and connect with our professionals for quick resolution.
Table of Contents
Why You Got Stuck With QuickBooks Error H202?
The users might come across Error Code H202 QuickBooks due to numerous factors. We have mentioned a few of them below, which will guide you to deal with the issue in an efficient manner.
- It may be caused due to misconfigured hosting settings in QuickBooks Desktop.
- Sometimes, it may happen due to a damaged or corrupt company file.
- You won’t be able to run some essential QuickBooks services such as QBCFMonitorService and QuickBooksDBXX are not running properly in the background.
- Windows firewall is creating issues while accessing the company file in multi-user mode.
Indications To Detect the QuickBooks Error H202
The following indications will help you identify QuickBooks Error H202. let’s have a glimpse at the pointers below closely.
- You won’t be able to launch the company file in a multi-user environment in QuickBooks.
- The users might observe that QuickBooks is running slow or started freezing for a few seconds while operating.
- The error message blinks on your computer screen on the arrival of the error.
- The Windows operating system starts responding slowly.
What Should You Do Before Going to Troubleshooting?
You must keep the following things in mind before you go to the troubleshooting part to fix QuickBooks Error Code H202.
- Company file backup must be scheduled on a regular basis to prevent data loss.
- The QuickBooks Desktop or Windows operating system you are using is updated to the presently available version.
- Your system is attached with a reliable and strong internet connection.
- Before moving to fixation methods, try to relaunch your device and the QuickBooks application.
Simple Tricks to Resolve H202 QuickBooks Error Within No Time
Are you fed up of looking for the proper resolution methods to overcome H202 QuickBooks Error? If that’s so, then you have arrived at the appropriate destination. Here, we have elaborated on the expert’s recommended solutions to wipe out the error.
Resolution Way 1: Review the Services Of Your Server
You must verify that the QuickBooks Services, such as QuickBooksDBXX, is running appropriately on your device. To check it, have a glance at the instructions explained below.
- To start the process, press the Windows key on your server computer.
- Launch the Run window by typing “Run” into the search area of the Start menu.
- In the upcoming window, write “services.msc” and hit the Enter key to launch the services window.
- Locate the service named QuickBooksDBXX, and double-tap on it to open.
- You must set the Startup Type category as Automatic by clicking the drop-down arrow.
- Also, check that the Service Status is set to “Running” or “Started” by clicking the drop-down arrow.
- You must opt for the Recovery tab and then go further.
- Afterwards, pick the Restart the Service option from every drop-down menu of First, Second, and Subsequent failures.
- Thereon, hit Apply and then OK to restore the changes you made.
- Finally, you are supposed to go through the same steps for QBCFMonitorService.
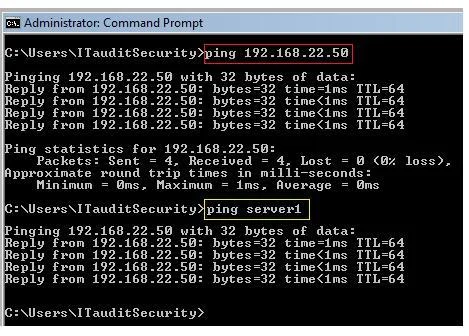
Resolution Way 2: Ping Your Server From the Workstation
The users have to ping from their workstations to cross-check the connection. For this, you must ping your server from every workstation confronting QuickBooks Error H202.
Enable the Network Discovery on your server computer and any computer facing Error H202 in QuickBooks.
- To commence with, tap on the Windows menu on both your server and the workstations.
- Insert “Network” within the search column and launch the Network and Sharing Center option.
- Following this, head towards the Change Advanced Sharing Settings option.
- Finally, cross-check that you have chosen Turn on Network Discovery from the section of Network Discovery and File and Printer Sharing.
Grab Your Server Name From Your Server
- To get the server name, click the Windows menu and launch the Run window.
- After this, type “CMD” into the search field and hit Enter key to launch the Command Prompt window.
- In the Command Prompt window, write the “ipconfig/all” command and hit the Enter key.
- Now, you must look for the hostname from the section of Windows IP Configuration. With this, you will see that the server name is written on the right-hand side.
- Jot down your hostname, or copy the same to a Word document to avoid issues.
Move Back to Your Workstation For Verifying the Server
- Begin the process by clicking on the Windows menu from the workstation.
- After this, launch the Run command window and add “CMD” to the search area.
- With this, it will launch the Command Prompt window on your screen. Herein, you are supposed to write the “ping [your server name]” and hit the Enter key. Be very attentive while giving the command, and avoid using brackets around your server name.
- It is mandatory to apply the same steps on every workstation encountering Error H202 QuickBooks.
- Later on, if you observe a reply for each packet with “No Loss”, it clearly indicates that the server is working appropriately.
- Conversely, if you notice packet loss or a very slow reply, then stop. Further, consult with your IT experts for assistance regarding your network.
Resolution Way 3: Deal With Network Issues Via QuickBooks Database Server Manager
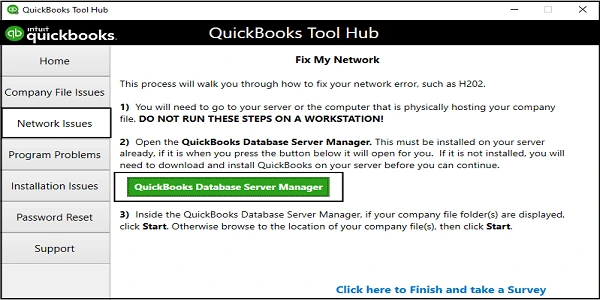
- Initially, get the newly launched version of the QuickBooks Tool Hub on your device.
- Once downloaded, double-tap on the downloaded file to begin the installation process.
- Next, open the tool on your screen and move to the highlighted Network Issues button.
- Soon after this, pick the QuickBooks Database Server Manager and then install it whenever required.
- Afterwards, hit the Start Scan button and look for your data file by hitting the Browse button.
- Once again, hit the Start Scan button and wait patiently until the scanning is over.
- Tap the Close button and open the QuickBooks application to check whether you encounter the same issue.
Resolution Way 4: Establish a New Folder For the QBW File
Sometimes, you must figure out the Error H202 in QuickBooks by generating a new folder. To do so, you must carry on with the step-by-step instructions listed below.
- Begin the process by generating a new folder on the server computer.
- Now, you must share the QuickBooks files after giving the relevant permissions to the new folder.
- Soon after this, copy and paste the QuickBooks company file (QBW) to the new folder.
- At last, launch your data file in the multi-user mode again to check that the error has been resolved.
Resolution Way 5: Take Help From QuickBooks Tool Hub
QuickBooks File Doctor is an essential tool used to diagnose and repair issues with the company file. You must follow the following instructions to download this tool on your device.
- Once you have successfully installed the QuickBooks Tool Hub on your device.
- After this, move to the Company Files option from the menu.
- You are supposed to pick the company file by tapping on the drop-down menu. If you can’t find the file, you can locate it from the available list.
- Once you get the file, mark the checkbox beside the Check Your File option and then hit the Continue option.
- Thereon, you are supposed to insert the correct admin username and password within the required text field and hit the Next button.
Final Thoughts!!
So, with this, we conclude this post and hope that the solutions illustrated above will guide you to rectify QuickBooks Error H202. However, if you are still struggling with the error, you can talk with our professionals via the live chat facility. Otherwise, you can mail your query and get an instant fix to the issue.
Frequently Asked Questions (FAQ’s)
Q1. What should I do to verify the numbers of computers hampered by QuickBooks Error H202?
Ans. Following are the steps to verify how many PC’s are connected with QuickBooks Error H202.
- Firstly, you must update the QuickBooks Database Server Manager on your server.
- Look for the services on your system and include them in the Windows Admin group.
- You must correct the settings of Windows Firewall and ping the server.
- At last, you have to add the server to the Windows host file.
Q2. Which ports must be added in the Firewall to fix QuickBooks Error H202?
Ans. To resolve the issues, you must add certain ports to your firewall settings. Have a look at the following ports you are required to add.
- TCP Port 8019:- You can utilize this port for the QuickBooks Desktop 2018 and later versions.
- TCP Port 56728:- This post is mainly utilized by the QuickBooks Desktop version 2017 or later.
Q3. What is the consequence of QuickBooks Error Code H202?
Ans. Whenever the user comes across QuickBooks Error H202, they won’t be able to utilize the company file in a multi-user environment. As, a result, it obstructs the users from continuing with their ongoing tasks and puts the entire work at a halt.
Q4. Can I resolve QuickBooks Error H202 by setting up the Windows Firewall?
Ans. Yes, you can fix the QuickBooks error Code H202 by setting up the Windows Firewall. For that, you have to generate exceptions for the system firewall. Thereon, you must make the necessary changes in the firewall permissions and install the QuickBooks desktop on all the workstations. Finally, move to the multi-user mode via the File menu settings.
Related Post:-